A: In the case of bubbles in the chip, it is preferable to hit the “Re-prime” button instead of simply flushing the chip. The “Flush” function will allow buffer to be pushed through the cartridge at a constant speed. The “Re-prime” function, like the “Prime” function, combines flushing and PZT vibrations to get rid of bubbles more efficiently. In the case of bubbles present in the cartridge inlet lines (sample and sheath) before they reach the chip, or the sample and sheath tubing, the user can click “Backflush” to change the sample pump direction for a minute.
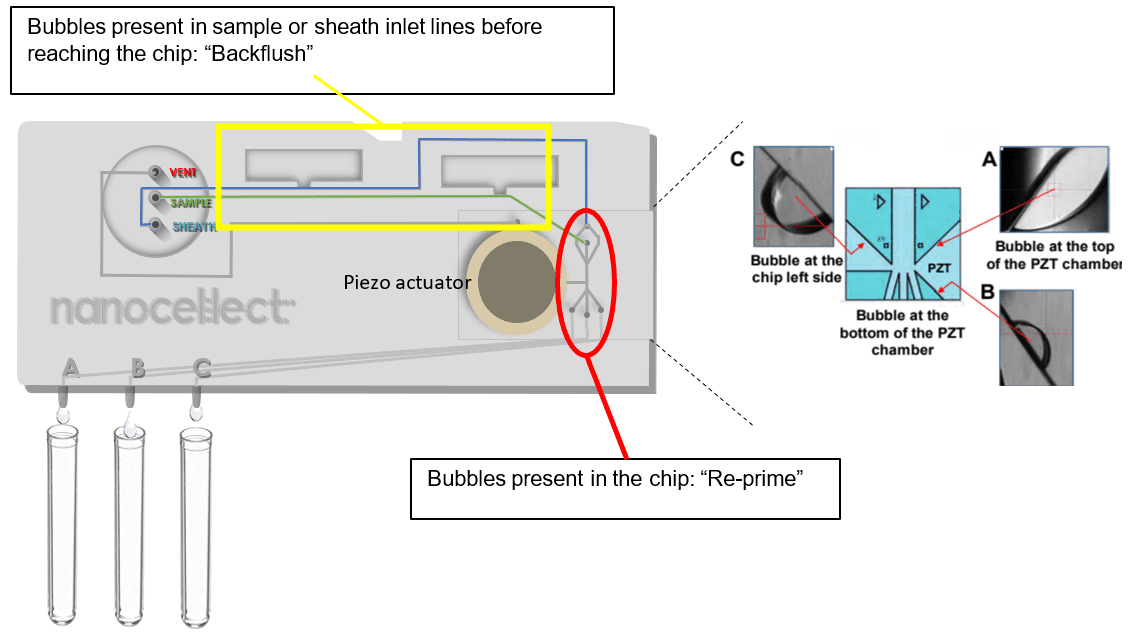
A: In the case of bubbles in the cartridge inlet lines (sample and sheath) before they reach the chip, or the sample and sheath tubing, the user can click “Backflush” to change the sample pump direction for a minute. Backflush should not be used to get rid of clogs – displacing clogs from the sorting junction using the Backflush functionality may clog the cartridge upstream of the chip and jeopardize the sort.
A: Fiber or dust clogs are frustrating and preventable. Here are some tips to minimize the likelihood of clogging the cartridge with a fiber clog:
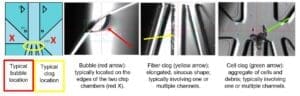
A: Bubbles, fiber clogs and cell clogs are potential issues that prevent smooth sorting. It is important to be able to distinguish the three, as their causes, solutions and prevention techniques are vastly different.
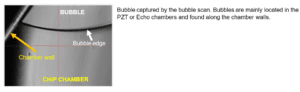
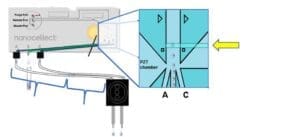
Bubbles: located mainly in the PZT and Echo chip chambers, bubbles are found typically clinging to the chamber walls.
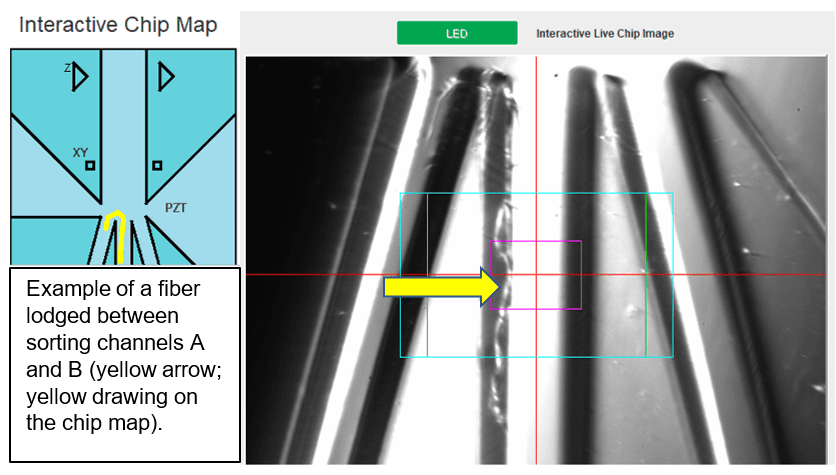
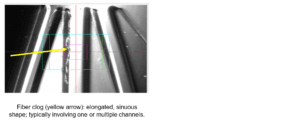
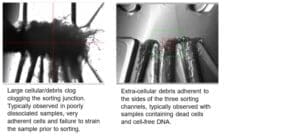
Fiber clogs: located at the sorting junction, typically block partially or completely one or multiple sorting channels. Fiber clogs have a hair-like appearance and typically do not form dense aggregates.
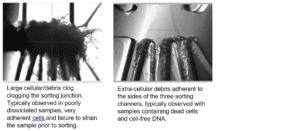
Cell and DNA clogs: located at the sorting junction, typically block off one or multiple sorting channels. Cell and DNA clogs appear like dense aggregates, increasing in size as the sorting progresses by layering of additional cells or debris.
A: Bubbles are a common consequence of incomplete priming. Bubbles can also be introduced accidentally through missing fluid in the sample or sheath tubes. The bubble scan function permits the user to visually verify that the chip is bubble-free. Re-priming the cartridge is typically sufficient to get rid of any remaining air. In case of persistent bubbles in the chip, make sure that:
On very rare occasions, the bubbles persist after multiple re-primes. This is especially true if they have been accidentally introduced by lack of fluid in the sample or sheath tubes. In this instance, changing cartridges is the best solution.
A: Fiber clogs negatively impact sorting accuracy and efficiency and are difficult to be flushed out. To prevent fiber clogs, filtering all buffers through a 0.22µm PES filter, wiping the unit and the sheath and sample tubing lines with a fiber-free isopropanol optical grade wipe and keeping the general area dust-free are the main recommendations.
A: Cell and DNA clogs negatively impact sorting accuracy and efficiency and are difficult to be flushed out. A cartridge change is recommended.
To prevent cell clogs, strain the samples through at 37µm mesh immediately prior to the sort, to get rid of any bigger aggregates. If the issue persists, it is essential to identify the underlying cause, that may be related to sample preparation (cell clumping, low viability, tissue dissociation etc).
The cause will depend on the sample, and the solution will be case-by-case. Some general ideas to decrease cell clogging are:
A: To prevent fiber clogs, all buffers in contact with the cartridge should be filtered immediately prior to use with a 0.22µm PES filter. Cells should be re-suspended in such filtered buffer prior to the run.
Avoid re-using filters as they degrade and release fibers.
NanoCellect recommended filter (Genesee Scientific CAT#25-244) is included with the starter pack every new user receives with the instrument at purchase.
In addition to filtering, it is important to follow all the guidelines to prevent fiber clogs (see “How can we avoid fiber or dust clogs” frequently asked question).

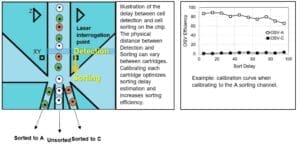
A: The calibration is a controlled process where increasing time delays between bead detection at the laser interrogation point and PZT triggering for sorting are tested for efficiency. By evaluating the presence or absence of the beads in the sorting channel following triggering, the software can determine whether the delay is adequate for efficient sorting. The algorithm tests sorting delays between 5µs and 100µs. 100 beads are sorted at each timepoint, and the average sorting efficiency is calculated as %. The calibration algorithm then chooses an effective time delay for each sorting channel and applies that delay towards subsequent sorts.
A: There are minor differences in the µm range between chips due to manufacturing. These slight variations can lead to differences in sorting; therefore, calibration is required to ensure optimal efficiency. In addition, it also indicates if the chip and cartridge are fully primed since the presence of bubbles decreases sorting efficiency.
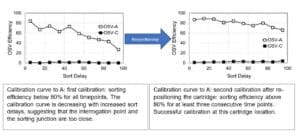
A: In the case of the inability to reach three consecutive timepoints with adequate sorting efficiency, the software will try to re-position the chip closer to or further away from the laser interrogation point to allow a more efficient sorting. The re-positioning will trigger a new calibration attempt. If the calibration passes, the cartridge will remain in this position for the rest of the experiment.
If the sorting junction and the interrogation point are too close, the calibration curve will have a decreasing efficiency with increased delays, resulting in decreased sorting efficiency. By moving the chip further away from the laser interrogation point, the distance between detection and sorting increases, and the sorting efficiency will increase, resulting in a flat curve above or close to 80% OSV efficiency. On the other hand, if the sorting junction and the interrogation point are too far, the calibration curve will have an increasing efficiency with increased delays. By moving the chip closer to the laser interrogation point, the distance between detection and sorting decreases, and the sorting efficiency will increase, resulting in a flat curve above or close to 80% OSV efficiency.
A: Compensation controls are necessary when more than 1 color is used to stain the cells. Compensation controls should be as bright as, or brighter, than your actual experimental sample, but not off-scale. In addition to single-color stained controls, an unstained sample should always be part of the panel for every sample.
Experimental cells: one approach is to use aliquots originating from the same sample that we want to sort (called here “experimental cells”). These aliquots will be either unstained or stained with only one color as controls. The experimental sample, composed of the same cells, will be stained with all the colors and used for sorting. The advantage of this approach is that the single-color controls will reflect the intensity of the staining present in the experimental sample. However, if the staining is very dim or difficult to detect, the compensation may be difficult to achieve.
Positive cells: another approach is to use cells that are known to highly express the marker of interest. These cells, only used for the single-color controls, will scatter differently than the experimental cells, but will present robust and consistent expression of the target marker, permitting to define with confidence the positive gate for the marker, thus making the compensation more accurate. The disadvantage is the additional complication of ordering or culturing one or multiple cell types that, besides their advantageous flow properties, are usually unnecessary.
Antibody-capture compensation beads: another approach is the use of beads, stained with the same antibodies as the cells of interest. These beads are usually coated with species-specific secondary antibodies, and capture conjugated primary antibodies developed in the given species with high efficiency. The positive signal achieved by using these beads is habitually very bright and permits easy calculation of the compensation matrix. The staining of antibody-capture compensation beads requires some development work – the antibody concentration used for staining the cells is habitually too high for the beads and the results is an off-scale signal. Adjusting voltage in this instance is not recommended, as it will reduce the sensitivity on your cells. Staining using 1/10 the amount of antibody on the beads as you do on the cells is a good starting point. In addition, these beads typically require the use of a conjugated primary antibody.
NanoCellect recommends the following product: SpectraComp beads (Slingshot Bio, SSB-05-A). Those beads have been extensively tested in house and meet all the requirements. In addition, they can be combined with the ViaComp beads for viability dye compensation (Slingshot Bio SSB-07-A). The beads are compatible with mouse, rat and hamster antibodies.
Nanocellect does not recommend the use of UltraComp beads (Invitrogen 01-3333-41), as they increase the risk of cartridge clogging.
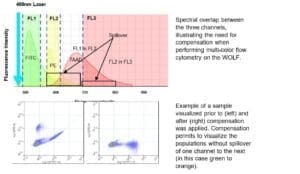
A: Spectral overlap refers to the phenomenon when a fluorochrome exhibits fluorescence that “spills over” into a detector channel where it is not expected to show up. This occurs because most fluorochromes have very broad emission spectra. Within a flow cytometer, the appropriate ranges of excitation and emission wavelengths are selected by bandpass filters. However, when emission spectra overlap, fluorescence from more than one fluorochrome may be detected. To correct for this spectral overlap, a process of fluorescence compensation is used.
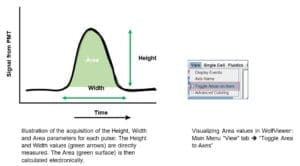
A: The reason why the Height is the preferred parameter in our system is related to the pulse information processing.
Our electronics uses the Width of the triggering channel to calculate the Area value in all the other detection channels. Therefore, peak Area is a calculated value while Height is measured directly by the pulse intensity signal detected by the PMT.
Therefore, we consider our Area values less accurate than the Height ones and we recommend our customers to use the latest for data analysis.
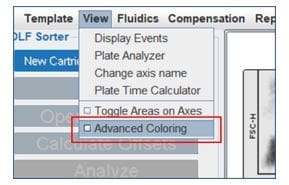
You can still use Area in WOLFViewer by going to the Main Menu “View” tab and selecting “Toggle Area to Axes”
Keep in mind that Area is not used when calculating the values for a compensation matrix, and you will need to change your plots to Height.
A: The NanoCellect cell sorters have a sorting speed of 300 cells/second for 1-way sorting and 150 cells/second for 2-way sorting. Some cells may not be sorted when processing highly concentrated samples with high target populations.
To assess whether there is target cell loss during the sort, the Advanced Coloring feature can be used. This feature is designed to monitor trigger counts and highlight the cells that are not sorted due to a high event rate. The feature also indicates which cells are sorted to channel A or C in a 2-way experiment and is a permanent record of the gates used for sorting if a template was not saved.
To use the tool:
3. Color Coding:
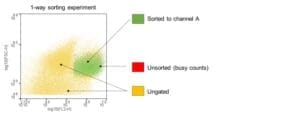
To minimize the number of unsorted cells that are lost due to busy counts dilute your cell sample with the same buffer used to prepare the cells.
A: Cell and DNA clogs negatively impact sorting accuracy and efficiency and are difficult to be flushed out. A cartridge change is recommended.
To prevent cell clogs, strain the samples through at 37µm mesh immediately prior to the sort, to get rid of any bigger aggregates. If the issue persists, it is essential to identify the underlying cause, that may be related to sample preparation (cell clumping, low viability, tissue dissociation etc).
The cause will depend on the sample, and the solution will be case-by-case. Some general ideas to decrease cell clogging are:
A: The cartridge can accommodate any liquid whose viscosity is comparable to water. Oils and emulsions are not compatible with the cartridge. In addition, the cartridge should not be in contact with bleach and organic solvents like ethanol.
Regarding standard cell culture media, the cartridge accommodates any type of media and the limitations will come from the sample more than from the cartridge. The system is not affected by phenol red, and media containing phenol red can be safely used for sorting. Keep in mind that the sample and sheath buffers should be as similar as possible to prevent light refraction that can affect scatter.
If uncertain as to what type of buffer you should use, a good start is the Basic Sorting Buffer:
If sorting lymphoid cells: use HBSS instead of PBS for better viability. EDTA can be omitted since lymphoid cells are not prone to clumping.
If sorting adherent cells: adjust the protocol for cell detachment from the plate by quenching the detachment buffer (Trypsin, Accutase) with a cation – free FBS buffer. Avoid using culture media or a PBS/FBS buffer, as it reintroduces the cations that facilitate the re-attachment of the cells to the plate (or each other). In addition, the level of EDTA can be increased if necessary, up to 5mM.
If sorting clumpy cells: Media containing panels of growth factors or other complex ingredients may contribute to increased clumping and simplifying the sheath buffer may help prevent clogging. This is to be tested for each individual sample. If using the Basic Sorting Buffer, consider making the following changes:
If sorting samples with high percentage of dead cells: assume that the sample will contain soluble DNA that will come out of solution. This DNA will start to coat the cells and lead to severe clumping. The addition of DNAse I to the sheath buffer (25-50µg/ml DNAse I + 1mM MgCl2) will help reduce DNA-associated clogging.
If sorting in cell culture media: Sorting in cell culture media is a good option for fragile cells. Carbon buffered media such as DMEM, while technically adequate, will change pH at room temperature quite rapidly. The length of the sort in DMEM may negatively impact sensitive cells, and carbon-independent media may be more adequate.
Overall, the system supports a wide variety of media types. The limitation will be the sample, and some development work may be needed for sensitive or clumpy cells.
A: The single cell deposition efficiency depends not only on accurate detection and sorting, but also on correct timing. For single cell dispensing, two cells of the target population are sorted back to back (1 cell to channel A, 1 cell to channel C). From the sorting junction, the cells will then travel through their channels and tubing to the single cell dispensing head, to be deposited into their corresponding wells.
A pause of 10 seconds is introduced after each pair of cells is sorted to ensure appropriate spacing between sorted cells and allow the cell dispensing head to move to the next wells and dispense the following cells with accuracy. During those 10 seconds, the rest of the cells passing detection point go to the waste container.
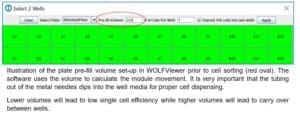
The sample concentration of 100 000 cells/ml is, on one hand, sufficiently high to permit a quasi-simultaneous sorting of the cell pairs dispensed in two adjacent wells; on the other hand, sufficiently dilute to trigger single cells only. A more concentrated sample would mean deposition of more than 1 cell/well with higher frequency, due to the proximity of the cells. A more diluted sample would mean longer waiting times to trigger a pair of cells, resulting in higher frequency of empty wells.
Single cell sorting method with the N1:
A: The NanoCellect microfluidic systems are unique in their sorting at very low pressure (2psi), minimally affecting the cells and ensuring high cell viability. This unique property permits to address low target population issues with more creativity and flexibility than conventional sorting.
For low and very low target populations (5-2.5%), sorting directly from the general pool of the cells is very slow and time consuming, especially if a greater number of target cells is required for downstream applications. For example, if the initial concentration of the sample is 500 000 cells/ml and the target population is very low (1%), per ml of sample, only 5000 cells are target candidates. To sort 100 000 of these cells will require 20ml of the initial sample and will take 16h to sort (47 minutes/ml), resulting in decreased viability, low purity, and a bad day for the scientist.
Enriching the target cells prior to use is a convenient way to speed up the process and increase sample purity. The enrichment will mainly depend on the type of sample and target cells, but in general, it can be done by either adding a sample purification step prior to the sort, or by sorting out unwanted cells during the sort first, then re-running the flow-through cells a second time through the cartridge, this time selecting for the target cells.
As an example of a purification step prior to the sort, a cell gradient, magnetic sorting techniques or immunopanning of unwanted cells can be used. It is to be noted that the NanoCellect systems can preserve better viability than these techniques.
As an example of a “double-sort” using the NanoCellect systems, a first step sorting can be performed using a sample stained for live-dead cells, and if possible, a marker present on a big fraction of the sample, but not on the target cells. The two-way sort of dead cells and positive cells will get the flow-through rid of dead cells and cells that are not of interest. The second sort of the flow-through, containing the cells of interest (stained either at the beginning of the sort, or, if multiple colors are needed, prior to the second sort), will then be feasible, having brought the target population percentage up by getting rid of unwanted cells.
A: Good sample preparation is essential to the success of a sorting experiment. We encourage optimizing sample preparation; it is essential to apply the best possible techniques to obtain a single cell suspension, preserve viability and stain the cells with maximal efficiency. Here are some general tips; keep in mind that sample type will play a big part in the optimization process, and some techniques may work better for some cell types than others.
In a multi-color experiment, you will need to create a compensation matrix to correct fluorochrome spillover. You can prepare your single stained controls at higher concentrations to speed up the data collection process, but don’t forget to dilute your actual sample for higher sorting purity (0.5×10⁶ cells/ml for bulk sorting; 0.1×10⁶ cells/ml for single cell sorting).
A: Connecting the instrument to the internet is not essential for its functioning properly. However, a permanent connection to the internet confers NanoCellect the ability to offer support more efficiently should any issues arise. Our service contract offers remote troubleshooting via TeamViewer, feature not available if the instrument is offline. Moreover, NanoCellect monitors devices using a SSL connection and data encryption to safely detect software and firmware errors, issues with operational protocols, and cartridge performance. This allows us to improve performance of our hardware, software, and consumables. Sensitive data, experimental data and user identity are not collected under any circumstances.
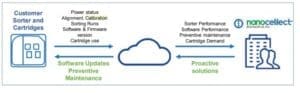
A: One of the big advantages of the NanoCellect systems is their low maintenance. If used correctly, the instruments do not require any maintenance save occasionally wiping down the unit and surrounding area with fiber free isopropanol optical grade wipes. A yearly preventative maintenance is part of NanoCellect’s service contract and consists in on-site or remote complete quality control check, run by the local Field Application Scientist. To ensure that your instrument remains in the best possible condition, make sure to:
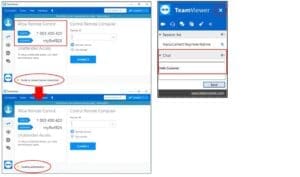
A: TeamViewer is an internet-based software that allows NanoCellect Technical Support to remotely access and control your NanoCellect computer for experimental assistance and troubleshooting sessions. The computer delivered with the instrument has TeamViewer installed, and a shortcut to the software is present on the desktop.
How to connect to TeamViewer:
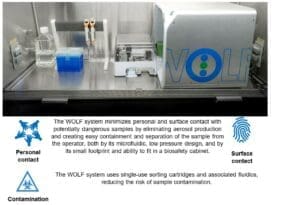
A: The NanoCellect systems are some of the safest flow sorters on the market, and when operated according to specifications, minimally expose operators to harmful agents such as aerosolized droplets, which are the major concern for operators of flow sorting systems.
A: The NanoCellect computer has three user accounts:
The NanoCellect Account: used to access the WOLFViewer software and operate the instrument. The password to this account is “nanocellect”.
The Customer Administrative Account: used to change the computer configuration, install new software and add the computer to internal networks. To obtain the password, call technical support with the serial number in hand.
The NanoCellect Administrative Account: used by NanoCellect Technical Service personnel for software and firmware updates. We do not provide the password for this account to track changes made in the computer from our side. The privileges for both administrative accounts are the same and you should be able to configure your computer as needed with the Customer Administrative account.
A: Connecting the instrument to a different computer is currently not possible. To perform appropriately with the instrument, the computer would need to meet certain performance criteria in terms of screen resolution, hard drive space, memory, and processor speed as well as operating system. The computer also needs a special configuration for firewall and firmware performance monitoring software. Please contact technical support for more questions.
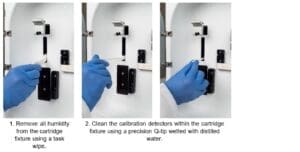
A: All microfluidic systems are at risk of clogging and leaking. To prevent a cartridge from leaking, always use it within specifications (single use within the same day, for a maximum of 6 hours after priming). Avoid cartridge clogging by appropriate sample preparation, as increased pressure in the chip can trigger a leak.
In the occurrence of a leak, remove all humidity from the cartridge fixture using a delicate task wipe. In addition, clean the calibration detectors within the cartridge fixture using a precision Q-tip wetted with distilled water. Introduce the tip, rub gently the right fixture wall to remove all sorting buffer residues. Left uncleaned, salt precipitates may form on the detector panel, leading to errors in detection. Wait for the unit to dry completely before performing the next sort.
A: The single cell deposition efficiency depends not only on accurate detection and sorting, but also on correct timing. For single cell dispensing, two cells of the target population are sorted back to back (1 cell to channel A, 1 cell to channel C). From the sorting junction, the cells will then travel through their channels and tubing to the single cell dispensing head, to be deposited into their corresponding wells.
A pause of 10 seconds is introduced after each pair of cells is sorted to ensure appropriate spacing between sorted cells and allow the cell dispensing head to move to the next wells and dispense the following cells with accuracy. During those 10 seconds, the rest of the cells passing detection point go to the waste container.
The sample concentration of 100 000 cells/ml is, on one hand, sufficiently high to permit a quasi-simultaneous sorting of the cell pairs dispensed in two adjacent wells; on the other hand, sufficiently dilute to trigger single cells only. A more concentrated sample would mean deposition of more than 1 cell/well with higher frequency, due to the proximity of the cells. A more diluted sample would mean longer waiting times to trigger a pair of cells, resulting in higher frequency of empty wells.
Single cell sorting method with the WOLF and N1:
A: The efficiency and precision of single cell sorting depends, on one side, on adequate initial sample concentration, and on the other side, on target population percentage. For a successful single cell sorting, make sure to:
A: The N1 single cell dispenser can accommodate almost any type of 96-well plate. It is important to always use the N1 Alignment Tool to create a plate template when using a new plate type. The following limitations can impact the instrument ability to dispense into certain plate types:
Recommendations
PCR Plates:
Adaptor for non-skirted plates: